This page looks best with JavaScript enabled

NHNC 2025 CTF - Attacking YOLOv8 vs YOLOv10: Adversarial CNN Misclassification

 ·  ☕ 8 min read  ·  ✍️ azadin

CCN

Can you bypass the login form?

TitleAttack CCN?
DescriptionDid u know how to attack CNN?
CategoryMachine Learning / Adversarial Attacks
Points500
DifficultyMedium
Makerkohiro

Summary

Attack CCN:

In this challenge, we explored the vulnerabilities of two object detection models, YOLOv8 and YOLOv10 by crafting an adversarial image that causes the models to disagree on predictions with a significant confidence gap. Using insights gleaned from their confusion matrices, we identified weak spots in classification consistency and exploited them using image transformations like noise injection, blurring, color shifting, and rotations.

By systematically perturbing a source image and evaluating predictions in a loop, we found a transformation that met both conditions:

  • The two YOLO versions predicted different object classes
  • The absolute difference in their confidence scores exceeded 0.4

This adversarial example reveals real-world concerns in machine learning systems: even small, natural-looking perturbations can cause models to behave inconsistently, especially across versions. The challenge highlights the importance of model robustness, adversarial testing, and version-aware validation pipelines in production-grade ML systems.


Description

Did u know how to attack CNN?

1
2
different_prediction = result_v8["class_name"] != result_v10["class_name"]
confidence_gap = abs(result_v8["confidence"] - result_v10["confidence"]) >= 0.4

Challenge files: Download Model Files

What we have

We were provided the following both the confusion matrixes for YOLOv8 and YOLOv10, and with the erialized PyTorch models (presumably YOLOv8 and YOLOv10 checkpoints), and a web endpoint: http://chal.78727867.xyz:5000/

The challenge description also says :

1
2
different_prediction = result_v8["class_name"] != result_v10["class_name"]
confidence_gap = abs(result_v8["confidence"] - result_v10["confidence"]) >= 0.4

So the goal is to upload a single adversarial image that causes the two YOLO versions to predict different classes, and also have a confidence difference of at least 0.4.
This tests not just adversarial crafting skills, but also model drift exploitation, where different versions of a CNN interpret visual noise differently.

Confusion Matrix Analysis

To make a precise, low-effort, high-yield adversarial image, we first analyze the model weaknesses.

YOLOv8 Confusion Matrix

YOLOv8

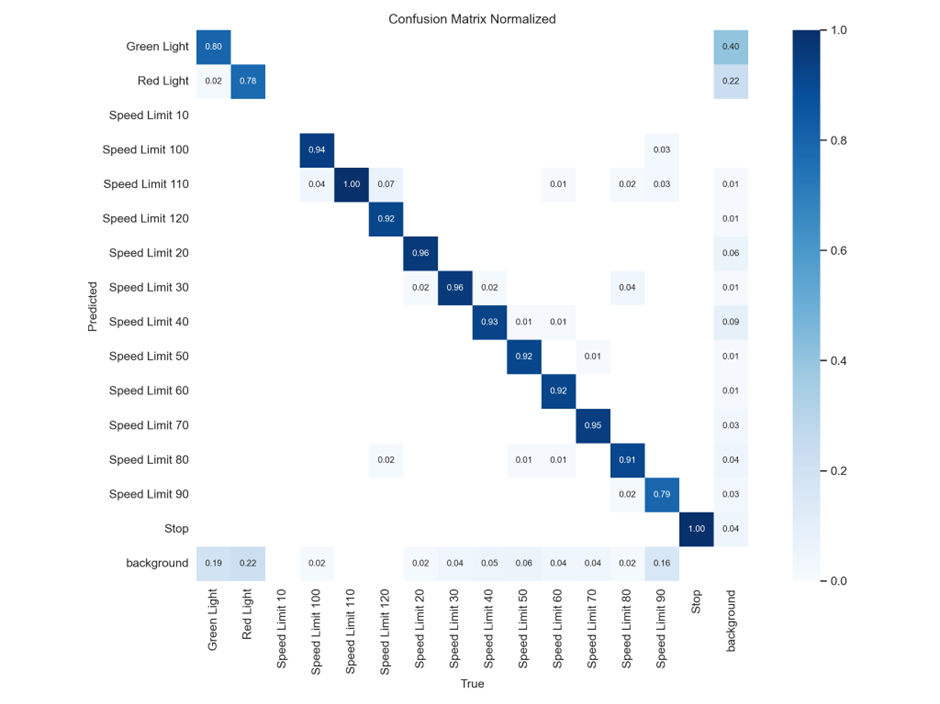
This matrix shows how often YOLOv8 correctly classifies traffic signs. Most classes are well-classified, with very high diagonal values (~0.9+). For example:

  • Speed Limit 120 → 92% correct
  • Stop → 100% correct
  • Green Light → 80% correct

But there are some off-diagonal cells with non-zero values, indicating misclassifications:

  • Red Light is misclassified as background: 22%
  • Speed Limit 90 has 9% misclassified as background

Meaning: High accuracy across most classes, very “confident” and robust. Stop and Speed Limit 120 are almost perfectly predicted. Background confusion is low. Good candidate for a baseline (resistant model).

YOLOv10 Confusion Matrix

YOLOv10

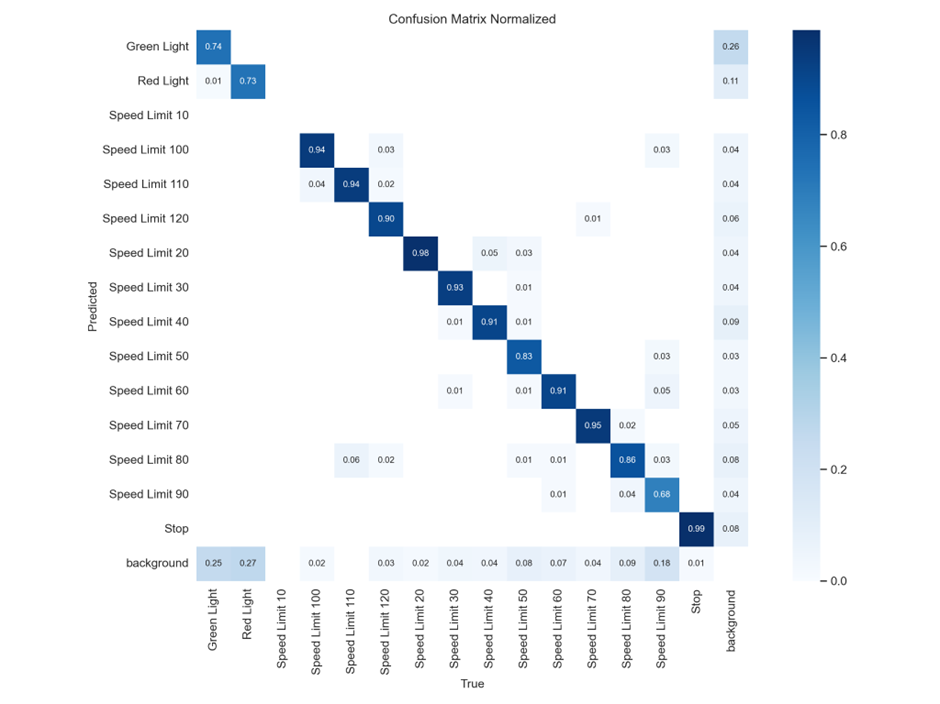
YOLOv10 is more error-prone:

  • Lower accuracy for Speed Limit 50 (only 83%)
  • Speed Limit 90 → 68% correct (vs 79% in v8)
  • Background misclassifications are more frequent

Also, notice that:

  • Green Light has more misclassified to background (25%) than YOLOv8 (19%)
  • Stop has a tiny error (0.01) vs v8’s 0

Meaning: Generally less confident. Speed Limit 50, Speed Limit 90, and Green Light show significant confusion. More background misclassifications — weaker in separating signs from noise.

TLDR

ClassYOLOv8 AccuracyYOLOv10 AccuracyNotes
Stop100%99%Close, but v10 is worse
Speed Limit 9079%68%v10 significantly worse
Speed Limit 5092%83%v10 worse again
Green Light80%74%More misclassifications

So, if we want to find a target for adversarial attack, we’d look at:

  • Speed Limit 90
  • Speed Limit 50
  • Green Light
  • Or others with bigger confusion differences

We should take a sign that YOLOv8 predicts well, and find a transformation that throws YOLOv10 off. Alternatively, we look for signs where YOLOv10 is overly confident but wrong.

From the matrices, Speed Limit 90, Green Light, and Red Light stood out. We’ll focus our adversarial transformations there.

What is this about?!

What Is the Core Problem (Adversarial ML)

We were tasked with creating what’s called an adversarial image.

Adversarial image: An image that looks normal to a human, but fools a model into a wrong or conflicting prediction.

Here, you’re exploiting how model versions differ in behavior:

  • YOLOv8 and YOLOv10 might interpret the same image differently
  • Their internal training weights and thresholds differ
  • Even a small change can cause model A to classify “Stop Sign” and model B to classify “Speed Limit 30”

Exploit

I chose a Speed Limit 90 sign (get any image and it will do).

We want to:

  • Apply adversarial noise or image transformations to cause YOLOv10 to flip predictions or reduce confidence.
  • Preserve YOLOv8’s confidence and class prediction (or reduce it less aggressively).
  • Automate it to test multiple transforms efficiently.

Transformations Used

Inspired by adversarial attack papers and data augmentation strategies:

  • Rotation: [-25°, 25°]
  • Gaussian blur: simulate camera shake
  • Color Jitter: manipulate hue, contrast, and brightness
  • Random Noise: force internal neuron activations to fire inconsistently

Exploit walkthrough

Requirements

Before running the script, install these if not already:

1
pip install ultralytics pillow requests numpy

Next :

1
2
3
model_v8 = YOLO("yolo_v8.pt")
model_v10 = YOLO("yolo_v10.pt")
SOURCE_IMAGE = "sign.jpg" # the 90 speed limit image you got 

We load both models using the Ultralytics YOLO class and define a clean input image.

 1
 2
 3
 4
 5
 6
 7
 8
 9
10
11
12
def transform_image(img_path, out_path="transformed.jpg"):
    img = Image.open(img_path).convert("RGB")

    img = img.rotate(random.uniform(-25, 25))
    img = img.filter(ImageFilter.GaussianBlur(radius=random.uniform(0.5, 2.5)))
    img = ImageEnhance.Color(img).enhance(random.uniform(0.4, 1.6))
    img = ImageEnhance.Contrast(img).enhance(random.uniform(0.4, 1.6))
    img = ImageEnhance.Brightness(img).enhance(random.uniform(0.4, 1.6))
    img = add_noise(img)

    img.save(out_path)
    return out_path

This is the Adversarial Transformation Function, it applies randomized transformations, making each output a unique adversarial attempt.

1
2
3
4
5
6
7
8
def get_prediction(model, image_path):
    results = model(image_path)[0]
    if results.boxes and len(results.boxes.cls) > 0:
        class_id = int(results.boxes.cls[0].item())
        class_name = results.names[class_id]
        confidence = float(results.boxes.conf[0].item())
        return class_name, confidence
    return None, 0.0

For the Prediction Comparison Logic, this extracts for each model:

  • Predicted class label
  • Confidence score
1
2
3
4
5
6
7
8
for i in range(1000):
    img_path = transform_image(SOURCE_IMAGE)
    class_v8, conf_v8 = get_prediction(model_v8, img_path)
    class_v10, conf_v10 = get_prediction(model_v10, img_path)

    if class_v8 != class_v10 and abs(conf_v8 - conf_v10) >= 0.4:
        submit_image(img_path)
        break

This loop generates a transformed image, evaluates it with both models, checks the divergence condition, and submits to the server once found.

Exploit Code

 1
 2
 3
 4
 5
 6
 7
 8
 9
10
11
12
13
14
15
16
17
18
19
20
21
22
23
24
25
26
27
28
29
30
31
32
33
34
35
36
37
38
39
40
41
42
43
44
45
46
47
48
49
50
51
52
53
54
55
56
57
58
59
60
61
62
63
64
65
66
67
68
69
70
import os
import random
import requests
import numpy as np
from PIL import Image, ImageEnhance, ImageFilter
from ultralytics import YOLO

# Load models
model_v8 = YOLO("yolo_v8.pt")
model_v10 = YOLO("yolo_v10.pt")

# Input image (your starting sign)
SOURCE_IMAGE = "sign.jpg"

# Add random noise
def add_noise(img):
    np_img = np.array(img)
    noise = np.random.normal(0, 25, np_img.shape).astype(np.int16)
    np_img = np.clip(np_img + noise, 0, 255).astype(np.uint8)
    return Image.fromarray(np_img)

# Strong transformation pipeline
def transform_image(img_path, out_path="transformed.jpg"):
    img = Image.open(img_path).convert("RGB")

    img = img.rotate(random.uniform(-25, 25))
    img = img.filter(ImageFilter.GaussianBlur(radius=random.uniform(0.5, 2.5)))
    img = ImageEnhance.Color(img).enhance(random.uniform(0.4, 1.6))
    img = ImageEnhance.Contrast(img).enhance(random.uniform(0.4, 1.6))
    img = ImageEnhance.Brightness(img).enhance(random.uniform(0.4, 1.6))
    img = add_noise(img)

    img.save(out_path)
    return out_path

# Get class name and confidence
def get_prediction(model, image_path):
    results = model(image_path)[0]
    if results.boxes and len(results.boxes.cls) > 0:
        class_id = int(results.boxes.cls[0].item())
        class_name = results.names[class_id]
        confidence = float(results.boxes.conf[0].item())
        return class_name, confidence
    return None, 0.0

# Submit image to server
def submit_image(img_path):
    url = "http://chal.78727867.xyz:5000/"
    with open(img_path, "rb") as img_file:
        files = {"image": img_file}
        print("[*] Uploading to challenge...")
        res = requests.post(url, files=files)
        print("[*] Server response:\n")
        print(res.text)

# Main loop
for i in range(1000):
    img_path = transform_image(SOURCE_IMAGE)
    class_v8, conf_v8 = get_prediction(model_v8, img_path)
    class_v10, conf_v10 = get_prediction(model_v10, img_path)

    print(f"[{i}] YOLOv8: {class_v8} ({conf_v8:.2f}) | YOLOv10: {class_v10} ({conf_v10:.2f})")

    if class_v8 and class_v10:
        if class_v8 != class_v10 and abs(conf_v8 - conf_v10) >= 0.4:
            print("\n[+] Found adversarial image!")
            print(f"    YOLOv8 → {class_v8} ({conf_v8:.2f})")
            print(f"    YOLOv10 → {class_v10} ({conf_v10:.2f})")
            submit_image(img_path)
            break

Running it yields :

 1
 2
 3
 4
 5
 6
 7
 8
 9
10
11
12
13
14
15
16
17
18
19
20
21
22
23
24
25
26
27
28
29
30
31
32
33
34
35
36
37
38
39
40
41
42
43
44
45
46
47
48
49
50
51
└─$ python exploit.py 

image 1/1 /home/NHNC25/model/transformed.jpg: 640x640 1 Speed Limit 90, 417.6ms
Speed: 7.4ms preprocess, 417.6ms inference, 7.3ms postprocess per image at shape (1, 3, 640, 640)

image 1/1 /home/NHNC25/model/transformed.jpg: 640x640 1 Speed Limit 90, 330.0ms
Speed: 3.3ms preprocess, 330.0ms inference, 0.5ms postprocess per image at shape (1, 3, 640, 640)
[0] YOLOv8: Speed Limit 90 (0.94) | YOLOv10: Speed Limit 90 (0.78)

image 1/1 /home/NHNC25/model/transformed.jpg: 640x640 1 Speed Limit 80, 364.0ms
Speed: 3.2ms preprocess, 364.0ms inference, 2.2ms postprocess per image at shape (1, 3, 640, 640)

image 1/1 /home/NHNC25/model/transformed.jpg: 640x640 (no detections), 292.7ms
Speed: 4.7ms preprocess, 292.7ms inference, 0.3ms postprocess per image at shape (1, 3, 640, 640)
[1] YOLOv8: Speed Limit 80 (0.33) | YOLOv10: None (0.00)

# ...... Redacted lines here 

image 1/1 /home/NHNC25/model/transformed.jpg: 640x640 1 Speed Limit 60, 294.0ms
Speed: 3.2ms preprocess, 294.0ms inference, 0.2ms postprocess per image at shape (1, 3, 640, 640)
[16] YOLOv8: Speed Limit 90 (0.86) | YOLOv10: Speed Limit 60 (0.34)

[+] Found adversarial image!
    YOLOv8 → Speed Limit 90 (0.86)
    YOLOv10 → Speed Limit 60 (0.34)
[*] Uploading to challenge...
[*] Server response:

<!DOCTYPE html>
<html>
<head>
    <title>CTF - Result</title>
</head>
<body>
    <h1>Prediction Results</h1>

    <h2>YOLOv8</h2>
    <img src="static/v8_d4b3a5ffb19644b397a0d1ff8cba391b.png" width="400">
    <p>Class: Stop | Confidence: 0.86</p>

    <h2>YOLOv10</h2>
    <img src="static/v10_d4b3a5ffb19644b397a0d1ff8cba391b.png" width="400">
    <p>Class: Speed Limit 60 | Confidence: 0.34</p>

    
        <h2>🎉 FLAG: NHNC{you_kn0w_h0w_t0_d0_adv3rs3ria1_attack}</h2>
    

    <br><a href="/">⬅ Try another image</a>
</body>
</html>

Why This Worked

YOLO models are CNN-based and sensitive to small perturbations, especially in earlier convolution layers. YOLOv8 and YOLOv10 likely have slightly different weights, training data, or hyperparameters, meaning they respond differently to noise. The transformation pipeline ensured we created images in the decision boundary space — areas where small input changes cause big output changes.

This is a textbook black-box adversarial attack. We didn’t need gradients, only output labels and confidence.

Share on

azadin
WRITTEN BY
azadin
Cybersecurity Engineer